Perfecting Laravel: TypeScript for Better, Bug-Free Code
Introduction
Ready for a smoother, more productive Laravel development experience? TypeScript can help you build robust, maintainable applications with fewer bugs. In this tutorial, we’ll supercharge your Laravel project using Inertia.js and Vue by adding TypeScript to the VILT stack (Vue, Inertia, Laravel, Tailwind CSS) we built in the previous post. Don’t worry if you haven’t followed along – the concepts here apply to any Laravel project using Inertia.js and Vue!
In this tutorial, we’ll dive into how to integrate TypeScript into your Laravel Inertia.js project, a powerful stack combining Laravel with Vue.js, leveraging Inertia.js and Ziggy for routing. Here’s what we’ll cover:
- Setting Up TypeScript: Install and configure the necessary TypeScript dependencies.
- Enhancing Your Code: Convert existing JavaScript files to TypeScript to harness type safety and other TypeScript features.
- TypeScript in Vue Components: Implement TypeScript in Vue components to improve reliability and maintainability.
- Optimizing Inertia.js and Ziggy: Add types to Inertia.js page props and Ziggy routes to prevent typos and errors.
Inpired By
- Tanner Campbell for the inspiration and the base of this tutorial.
Adding TypeScript Support
Step 1: Installing TypeScript Dependencies
Let’s start by setting up the necessary TypeScript dependencies to transform your Laravel application into a more powerful and scalable system. Which will lead to happier developers and fewer bugs.
First, let’s install our TypeScript dependencies.
1
sail npm install -D @types/node typescript
Step 2: Configuring Typescript
Next, create a tsconfig.json file in the root of your project.
1
touch tsconfig.json
Add the following:
1
2
3
4
5
6
7
8
9
10
11
12
13
14
15
16
17
18
19
20
21
22
23
24
25
26
27
{
  "compilerOptions": {
    "target": "esnext",
    "module": "esnext",
    "moduleResolution": "node",
    "strict": true,
    "jsx": "preserve",
    "sourceMap": true,
    "resolveJsonModule": true,
    "esModuleInterop": true,
    "allowJs": true,
    "lib": ["esnext", "dom"],
    "types": ["@types/node"],
    "paths": {
      "@/*": ["./resources/js/*"],
      "ziggy-js": ["./vendor/tightenco/ziggy"],
    },
    "outDir": "./public/build/assets"
  },
  "typeRoots": ["./node_modules/@types", "resources/js/types"],
  "include": [
    "resources/js/**/*.ts",
    "resources/js/**/*.d.ts",
    "resources/js/**/*.vue"
  ],
  "exclude": ["node_modules", "public"]
}
Step 3: Convert .js to .ts
Next we need to update our files to use .ts instead of .js. We will start by renaming app.js to app.ts.
Rename resources/js/app.js to resources/js/app.ts.
1
mv resources/js/app.js resources/js/app.ts
Now, let’s also update files referencing it:
1
2
3
4
5
6
7
8
...
export default defineConfig({
    plugins: [
        laravel({
            input: ['resources/css/app.css', 'resources/js/app.ts'], // From this
            input: ['resources/css/app.css', 'resources/js/app.ts'], // To this
            refresh: true,
        }),
Next we want to update our resources/views/app.blade.php to reference app.ts instead of app.js.
1
2
3
4
5
6
7
8
9
10
11
12
13
<!DOCTYPE html>
<html>
  <head>
    <meta charset="utf-8" />
    <meta name="viewport" content="width=device-width, initial-scale=1.0, maximum-scale=1.0" />
    @vite('resources/js/app.js') // From this
    @vite('resources/js/app.ts') // To this
    @inertiaHead
  </head>
  <body>
    @inertia
  </body>
</html>
Next we need to rename resources/js/bootstrap.js to resources/js/bootstrap.ts.
1
mv resources/js/bootstrap.js resources/js/bootstrap.ts
Since bootstrap.js is only used within app.ts and doesn’t include the extension, we are good to go.
Step 4: Reloading VSCode
Sometimes VSCode is a bit slow and isn’t providing you with any IntelliSense, and nothing happens when you hover your mouse over a TypeScript variable.
If this is the case, you should reload your window by pressing: CTRL+SHIFT+P and enter Developer: Reload Window. This should fix that.
Using TypeScript within Vue Components
Now that we have added TypeScript support to our project, We can now utilize TypeScript within our Vue.js components. To indicate that a component uses TypeScript, there is one important thing that you might often forget (if you are like me…)
Step 1: Enable Typescript in Vue components
Before we spend the whole day playing with typed Vue components, we first need to specify in our <script> tag that we are using TypeScript. You do this by adding lang="ts" to your Vue component. Below is an example of this.
Vue javascript component:
1
2
3
<script setup>
...
</script>
Vue typescript component:
1
2
3
<script setup lang="ts">
... Insert lovely typed code here
</script>
Please note that that setup is a new feature in Vue 3, which allows you to write your Vue components in a more functional way. You can read more about it here.
Step 2: Vue Component Typescript Examples
Let’s go through a quick example of how we can harness this newfound power.
Bare in mind that I am using Vue Composition API, instead of Vue Options API, this is pure preference. You can click the links to read more about them if you are interested in the difference.
A key benefit of TypeScript in Vue components is the ability to strictly type props, ensuring data passed between components is predictable and error-free. Let’s see how this works in practice.
First in order to convert a Vue component to TypeScript, we need to add lang="ts" to the script tag. Then we can define our props with types.
1
2
3
4
5
6
7
8
9
10
11
12
13
14
15
16
<script setup lang="ts"> // <------ Remember to add lang="ts" to script tag
import { defineProps } from 'vue'

// Import PropType from vue
import type { PropType } from 'vue'

defineProps({
  message: String // Change from this
  message: String as PropType<string> // To this
})
</script>
<template>
  <div>
      <p>  {{ message }}  </p>
  </div>
</template>
This example might not be all that exciting so lets go more crazy with components with custom types like this:
1
2
3
4
5
6
7
8
9
10
11
12
13
14
15
16
17
18
19
20
21
22
23
24
25
26
27
28
29
30
31
32
33
34
35
36
37
38
39
40
41
42
43
44
45
46
47
<script setup lang="ts">
import { defineProps } from 'vue'
import type { PropType } from 'vue'

interface Book {
  title: string
  author: string
  year: number
}

// ##### Simplest form #####
defineProps({
  book: Object as PropType<Book>
})

// ##### Make it required #####
defineProps({
  book: {
    type: Object as PropType<Book>,
    required: true,
  }
})

// ##### Use default value #####
defineProps({
  book: {
    type: Object as PropType<Book>,
    default() {
      return {
        title: 'Default Title',
        author: 'Default Author',
        year: 2021
      }
    }
  }
})

// ##### Use validator #####
defineProps({
  book: {
    type: Object as PropType<Book>,
    validator: (value: Book) => {
      return value.title.length > 0
    }
  }
})
</script>
How about that? Cool right? We just typed our Vue component, just like that!
If you want to learn more about how to harnest the full potential of Typescript in Vue, you can check out the full documentation here: vuejs.org/guide/typescript/composition-api.
Adding Inertia.js Page Props Types
Since we are using Inertia.js, we can also type our page props (also called shared-data).
Step 1: Adding Types to Inertia.js Page Props
Let’s start by creating a types directory in our resources/js directory. This is where we will store all our TypeScript declaration files.
1
mkdir resources/js/types
Next, let’s create a declaration file called inertia.d.ts in the resources/js/types directory:
1
touch resources/js/types/inertia.d.ts
Add the following to the inertia.d.ts file:
1
2
3
4
5
6
7
8
9
10
import { PageProps as InertiaPageProps } from '@inertiajs/core';

// Globally page props provided by `./app/Http/Middleware/HandleInertiaRequests.php`
interface AppPageProps {
  // This is where we can add our global page props
}

declare module '@inertiajs/core' {
  interface PageProps extends AppPageProps, InertiaPageProps {}
}
Step 2: Example of Using Inertia.js Page Props Types
Lets say we want our user to be available in all our Vue components. This would very useful if we want to display the user’s name in the header of our application. We can add the user object to our HandleInertiaRequests middleware.
1
2
3
4
5
6
7
8
9
10
11
12
13
14
class HandleInertiaRequests extends Middleware
{
    // ... Rest of the code
    public function share(Request $request): array
    {
        return array_merge(parent::share($request), [
            'user' => [
                'id' => "1", // OR $request->user()->id,
                'name' => "John Doe", // OR $request->user()->name,
                'email' => "[email protected]", // OR $request->user()->email,
            ],
        ]);
    }
}
Next, we need to update our inertia.d.ts file to include the user object.
1
2
3
4
5
6
7
8
9
10
11
12
13
14
import { PageProps as InertiaPageProps } from '@inertiajs/core';

// Globally page props provided by `./app/Http/Middleware/HandleInertiaRequests.php`
interface AppPageProps {
  user: {
    id: string;
    name: string;
    email: string;
  };
}

declare module '@inertiajs/core' {
  interface PageProps extends AppPageProps, InertiaPageProps {}
}
Now we have added the user object to our page props. We can now access the user object in our Vue components with typescript support.
How cool is that? We can now access the page props in our Vue components with typescript support.
Bare in mind that we obviously need to update our resources/js/types/inertia.d.ts every time we add a new page prop to our HandleInertiaRequests middleware. This is a small price to pay for the benefits of typescript.
Adding Types to Ziggy Routes (Optional)
Ziggy is a fantastic Laravel package that integrates Laravel’s routing capabilities directly into JavaScript. This seamless integration allows you to access Laravel routes in your JavaScript code, effectively bridging the gap between backend and frontend for a smoother development experience. We installed Ziggy in my last post: Setting up a perfect Laravel stack with VSCode DevContainer; feel free to check it out if you haven’t.
If you’re using Ziggy for your routes, adding TypeScript types will help prevent typos and other common errors when utilizing the route helper in your Vue components.
Next, we’ll update our tsconfig.json to ensure that the types from ziggy-js are globally available in our project.
1
2
3
4
5
6
7
{
  "compilerOptions": {
    ...
    "types": ["@types/node", "@types/ziggy-js"], // <--- Add "@types/ziggy-js"
    ...
  },
}
Next we want our intellisense to acknowledge our route() function globally within our Vue components. This gave me a lot of headache, however here it is.
We will create a type declaration file: vue-ziggy.d.ts within resources/js/types.
1
touch resources/js/types/vue-ziggy.d.ts
Then we add the following.
1
2
3
4
5
6
7
8
9
10
11
12
// This makes the `route()` available globally within our <script> tags
import { route as routefn } from 'ziggy-js'
declare global {
  const route: typeof routefn;
}

// This makes `route()` available in the <template> to the type checker
declare module '@vue/runtime-core' {
  interface ComponentCustomProperties {
    route: typeof routefn
  }
}
route() should now be available within our lovely Vue components. Neat!.
But wait, we can even go one step further and get autocomplete on the available routes!
We can make Ziggy generate us a type declaration file, which all the current existing routes. Simply run:
1
sail php artisan ziggy:generate --types resources/js/types/ziggy-auto-generated.js --types-only
This creates a file new file within resources/js/types with all of our routes within our project.
1
2
3
4
5
6
7
8
9
10
11
/* This file is generated by Ziggy. */
declare module 'ziggy-js' {
  interface RouteList {
    "ignition.healthCheck": [],
    "ignition.executeSolution": [],
    "ignition.updateConfig": [],
    "welcome": [],
    "dashboard": []
}
}
export {};
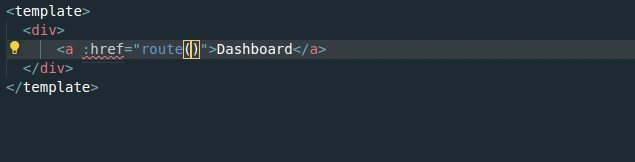
And there we go; you now also have types for your Ziggy routes!
Conclusion
Wrapping up, you’ve just turbocharged your Laravel Inertia.js project with TypeScript! Not only does this mean fewer sneaky bugs and more straightforward code, but you’ve also set yourself up for a smoother, more enjoyable development experience. Adding TypeScript brings a whole new level of sophistication and fun to your coding, making it easier to manage and more powerful.
Here’s to fewer bugs, cleaner code, and more fun coding sessions ahead! 🚀
What’s Next?
- Challenge yourself: Experiment with TypeScript in your own projects!
- Share your experience: Let me know your thoughts and experiences with TypeScript in Laravel.
- Stay tuned for more: I will be sharing my journey trying to perfect the Laravel stack with TypeScript, hope you will join me!